Task Force Arrowhead Radio (Radio Tutorial)KeysPush-to-talk button in TeamSpeak Direct Speech.
Caps Lock To talk on a radio.
CTRL + Caps Lock To talk on a long range radio.
CTRL + P To open the personal radio interface (the radio must be in the inventory slot). In that case if you have a number of radios - you can select the one needed. It is also possible to set the radio as active (the one that will be used for transmission). Also it is possible to load radio settings from another radio with same encryption code.
CTRL + + [/] Cycle through available shortwave radios.
CTRL + Up/Left/Right Arrow Rapid switching of shortwave stereo mode.
NUM[1-8] Rapid switching of shortwave radio channels.
ALT + P To open a long range radio interface (a long range radio must be put on your back, or you should be in a vehicle in a position of a driver, shooter, or pilot assistant). If a number of radios are available – you'll be offered to choose one. Besides, one of them can be set as active. Also it is possible to load radio settings from another radio with same encryption code.
CTRL + ALT + [/] Cycle through available long range radios.
ALT + Up/Left/Right Arrow Rapid switching of long range stereo mode.
CTRL + NUM[1-9] Rapid switching of long range radio channels.
CTRL + TAB To change the direct speech volume. You can talk: Whispering, Normal or Yelling. Does not affect the signal volume in the radio transmission.
SHIFT + P To open an underwater transceiver interface (you should be wearing a rebreather).
CTRL + ~ To talk on underwater transceiver.
CTRL + ] Select next personal radio.
CTRL + [ Select previous personal radio.
CTRL + ALT + ] Select next long range radio.
CTRL + ALT + [ Select previous long range radio.
CTRL + [â†,↑,→] Change personal radio stereo mode.
ALT + [â†,↑,→] Change long range radio stereo mode.
T Transmit on additional channel of personal radio.
Y Transmit on additional channel of long range radio.
ESC To exit from the radio interface.
Ranges(BLUFOR Radios)Radio AN/PRC-152 (personal): 30-512Mhz / 5 km
Radio RF-7800S-TR (rifleman): 30-512Mhz / 2 km
Radio RT-1523G (ASIP) (long range): 30-87Mhz / 20 km (30 for inbuilt)
Radio AN/ARC-210 (airborne): 30-87Mhz / 40 km
(INDI Radios)Radio AN/PRC-154 (rifleman): 30-512Mhz / 2 km
Radio AN/PRC148-JEM(personal): 30-512Mhz / 5 km
Radio AN/PRC-155 (long range): 30-87Mhz / 20 km (30 for inbuilt)
Radio AN/ARC-164 (airborne): 30-87Mhz / 40 km
(OPFOR Radios)Radio FADAK (personal): 30-512Mhz / 5 km
Radio PNR-1000A (rifleman): 30-512Mhz / 2 km
Radio MR3000 (long range): 30-87Mhz / 20 km (30 for inbuilt)
Radio MR6000L (airborne): 30-87Mhz / 40 km
(Underwater)Underwater transceiver All: 32-41kHz / 70-300 m (depending on waves)
BLUFOR RadiosRF-7800S-TR + MicroDAGR Radio Programmer (Basic Rifleman Radio/Short Range)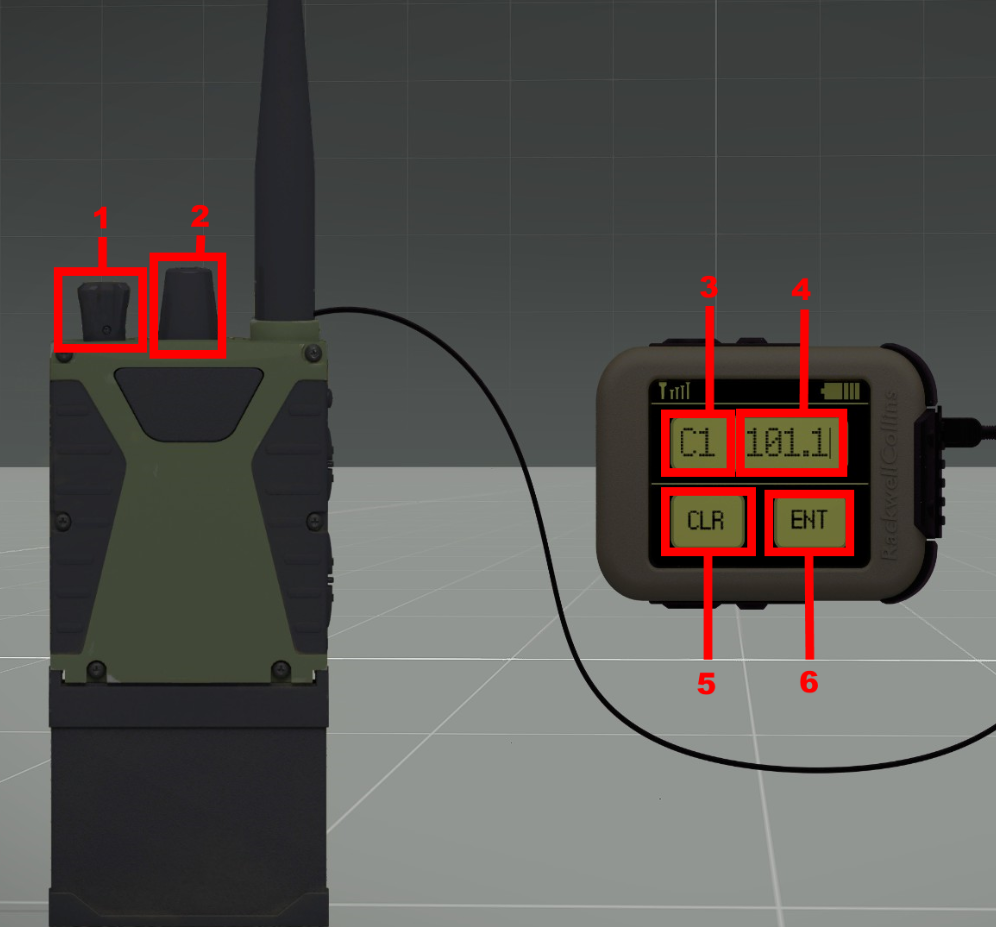
1. Previous Channel (Left Click) | Next Channel (Right Click)
2. Decrease Volume (Left Click) | Increase Volume (Right Click)
3. Current Channel
4. Current Frequency
5. Clear Frequency
6. Enter Frequency
To change your
"Current Channel", left or right click on 1. If you want to change your
"Current Frequency" you must highlight the
"Current Frequency" area (
4) with your mouse and type in the wanted Frequency with your keyboard, then click the
"Enter Frequency" button (
6).
Once you have set your fireteam radio channel, you can then place the
MicroDAGR Radio Programmer into your backpack and replace it with the watch in your inventory. To change the frequency again you will have to re-equip the
MicroDAGR Radio Programmer in your watch slot.
AN/PRC-152 (Squad Level Radio/Medium Range)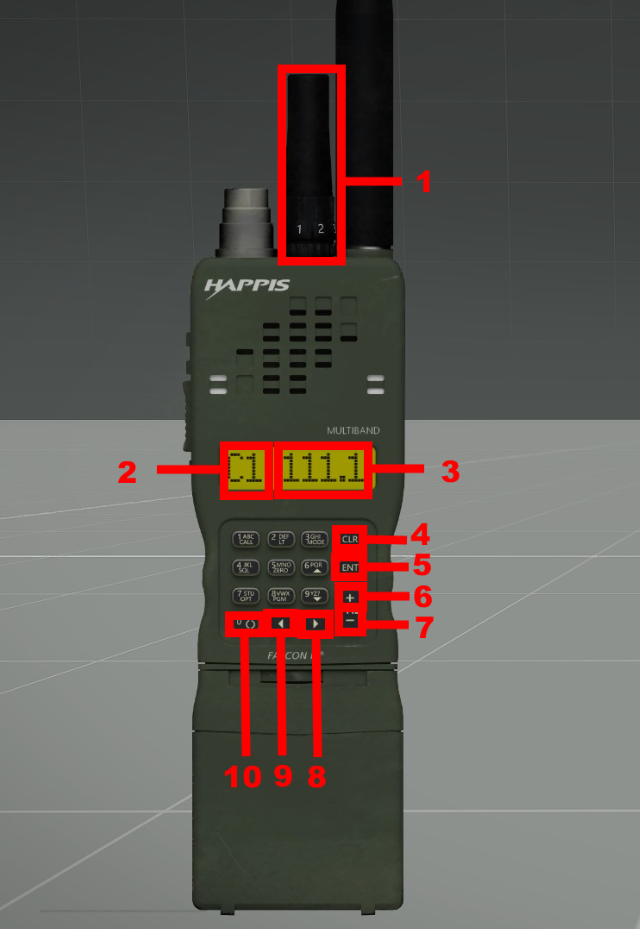
1. Previous Channel (Left Click) | Next Channel (Right Click)
2. Current Channel
3. Current Frequency
4. Clear Frequency
5. Enter Frequency
6. Next Channel
7. Previous Channel
8. Speakers
9. Set additional channels
10. Stereo settings
To change your
"Current Channel", press the
"Next Channel" (
6) and
"Previous Channel" (
7) buttons. If you want to change your
"Current Frequency" you must highlight the
"Current Frequency" area (
3) with your mouse and type in the wanted Frequency with your keyboard, then click the
"Enter Frequency" button (
5).
The 152 has a feature which allows you to set an additional channel. Follow these steps: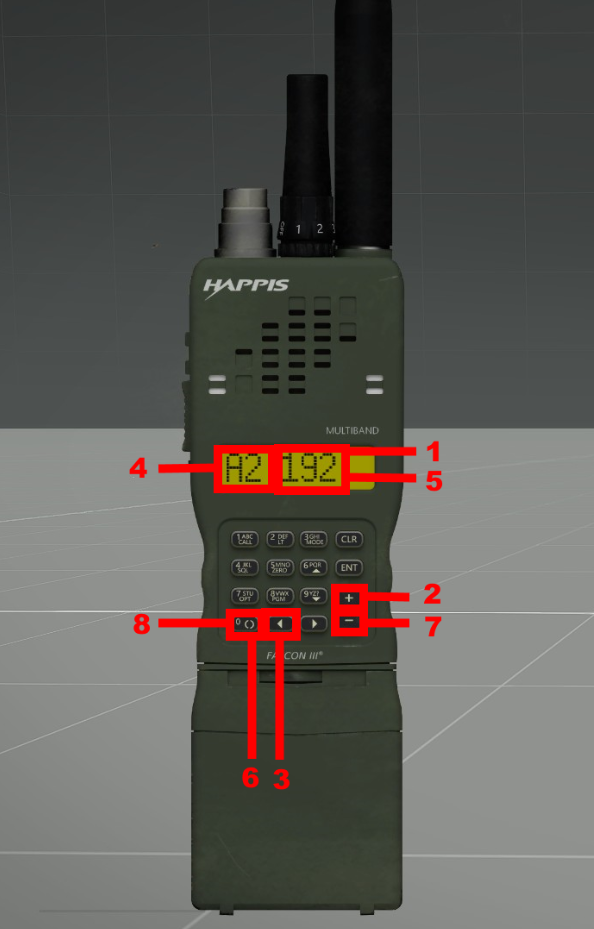
1. Set the
"Current Frequency" area to the
primary channel you want to have then confirm it by pressing
"Enter Frequency".
2. Click
"Next Channel"3. Click
"Set additional channels"4. You can see if this worked if the
"Current Channel" area now says
"A2" as seen in the picture above.
5. Set the
"Current Frequency" area to the
secondary channel you want to have then confirm it by pressing
"Enter Frequency".
6. Click "Stereo settings" to change it to either the
left ear or
right ear so you can tell the difference from the
primary and
secondary channels
7. Click the
"Previous Channel" button to return to your primary channel.
8. Click
"Stereo settings" to change it to the opposite of what you set for your
secondary channel to.
AS YOUR FINAL STEP!: Repeat step
3 and you have finished! You shall now be able to hear two channels at once, and to talk on either of them:
- To speak on your
primary channel press
"Caps Lock" on your keyboard.
- To speak on your
secondary channel press
"T" on your keyboard.
RT-1523G (ASIP) Big BWMOD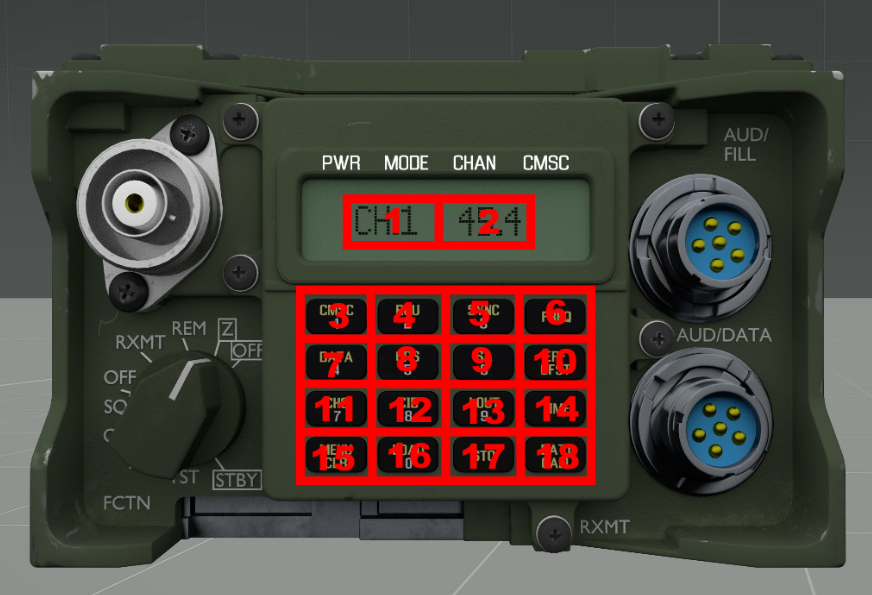
1. Current Channel
2. Current Frequency
3. Channel 1
4. Channel 2
5. Channel 3
6. Set Frquency
7. Channel 4
8. Channel 5
9. Channel 6
10. Set additional channel
11. Channel 7
12. Channel 8
13. Channel 9
14. Increase volume
15. Clear Frequency
16. Speakers
17. Stereo settings
18. Decrease volume
The RT-1523G (ASIP) has a feature which allows you to set an additional channel. Follow these steps: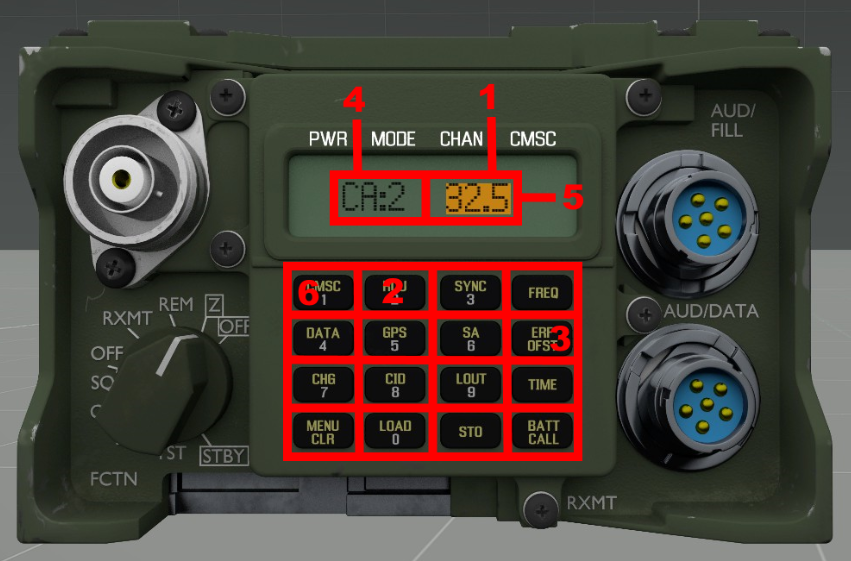
1. Set the
"Current Frequency" area to the
primary channel you want to have then confirm it by pressing
"Set Frequency".
2. Click
"Channel 2"3. Click
"Set additional channel"4. You can see if this worked if the
"Current Channel" area now says
"CA:2" as seen in the picture above.
5. Set the
"Current Frequency" area to the
secondary channel you want to have then confirm it by pressing
"Set Frequency".
6. Click the
"Channel 1" button to return to your primary channel.
You shall now be able to hear two channels at once, and to talk on either of them:
- To speak on your
primary channel press
"Left Ctrl + Caps lock" on your keyboard.
- To speak on your
secondary channel press
"Y" on your keyboard.
Vehicles- A long range radio is available for a driver, commander, shooter, and pilot assistant. Not all the vehicles support built-in radios.
- Each vehicle slot has its own radio, which must be configured separately. If you plan to change the position in a vehicle – configure the radio in all the slots beforehand (for instance, on a driver or shooter slot).
- Vehicles are classified into open and closed (isolated). If you are in an isolated vehicle, you will almost not hear voices from outside (and vice versa). However, if you turn out of the vehicle, you will hear voices both from inside and outside.
Radio Interception- Radio can be taken from killed players, and given to each other. Thus, they retain all the settings (channels, frequency, volume).
- It is recommended to take radios opening the inventory at the place where it is (so that it is not lost because of the game bugs).
- In vehicles radio settings are also saved.
- By default, radios of each faction use their own encryption codes, so you will not hear enemy talks, even setting the enemy’s frequency. To listen to the enemy’s net (and talk on the air) - it’s necessary by any means to capture an enemy radio station.
Underwater TFAR- You can not talk underwater (even wearing a diving suit). However, at close distance your companion can hear some indistinct speech (exception - if you are underwater in an isolated vehicle).
- Being underwater, you can faintly hear muffled voices on land.
- Use an underwater transceiver for communication among divers.
- You can not use radio communication underwater (neither to talk nor to hear). If you want to pass some message on land - surface. Exception - submarine in the periscope depth (divers can use a long range radio there).
- CTRL + ~ To talk on underwater transceiver. (It's inbuilt into the divers mask)
Solving Problems- Pipe error 230 - most likely you've forgot to enable the plugin in TeamSpeak.
In TS the plugin is red and not loaded - most likely you will have to update TeamSpeak.
Try to reaload plugin. - Caps Lock actions aren't working - perhaps because of gaming keyboards, whereCaps Lock code is different. Try to change the active keys (by editing the userconfig).
- If due to an error or something else you cannot hear other players any more, even outside the game, open Setup 3D Sound in TeamSpeak and click Center All.
- To eliminate possible errors with the plugin, developers may need the TeamSpeak log. To copy it, select Tools -> Client Log, select all the checkboxes above and, selecting all the text by CTRL A, copy it to the clipboard.
- If TeamSpeak stops working (Heaven forbid!) using the plugin - it shows a window with a description where you can find a dump (the path to the file). I would be very grateful to receive this file.


